Wood Rot & Epoxy FAQs
- Q: Why should I use epoxy to repair deteriorated wood?
- Q: What’s the difference between consolidation and patch/filling?
- Q: Do I have to remove all of the rotted wood from the affected area?
- Q: How dry should the wood be before attempting epoxy repairs?
- Q: What’s the difference between a cosmetic repair and a structural repair?
- Q: How do I determine how much epoxy I will need to make my repairs?
- Q: Must I wait for the consolidant to cure fully before applying epoxy patch on top?
- Q: Can the epoxy products be mixed in smaller quantities than those in which they’re sold?
- Q: Can epoxy repairs be painted or stained to match surrounding areas?
- Q: Where can I get ConServ products?
- Q: Why should I use epoxy to repair deteriorated wood?
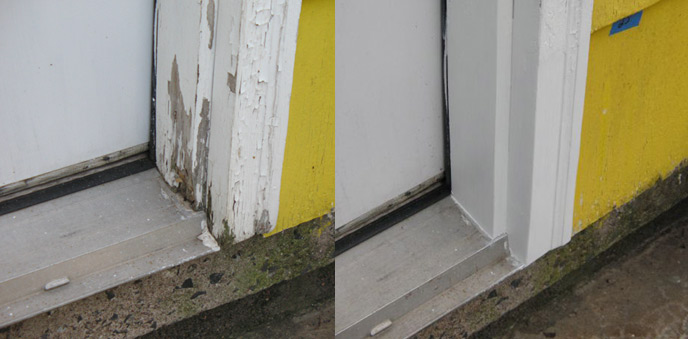
A: Epoxy can save lots of existing wood that has partial decay. Often this wooden fabric is valuable for its durability, character, antique value or because replacement is either difficult, expensive and/or may not last long. Epoxy can sometimes be an easier solution that could last longer than replacement.
Over the years, people have commonly used materials like mortar, concrete, wood putty, caulk and the like to fill and repair rotted portions of wood on houses, cabins, trim and furniture. Although these repairs apparently solved the current problems they all presented additional difficulties sometimes within a few short years. Each of them contained some form of vehicle to transport the filler material, such as water in the case of mortar or concrete, and solvents in the wood fillers and caulks. The solubles in these products are prone to evaporation and thus shrinkage as the materials age. As the shrinkage occurs, adhesion is lost between the patch and the adjacent wood creating a crack or void which can trap moisture, harbor infestation, promote deterioration and eventually lead to the failure of the repair as the filler falls out.
ConServ 100 and 200 Epoxies are made from a "flexible" formulation of virgin epoxy resins with no solvents to off gas or evaporate. This makes for a very stable "non-shrinkable" patch filler, which is capable of flexing and adapting to daily and seasonal temperature changes over its entire life. ConServ Epoxy 200 series patch is pliable enough to modify and trim with conventional carpentry tools. The patch most closely imitates the density and properties of real wood, being flexible enough to move slightly with the wood. Over thirty years of successful field applications give ConServ Epoxies the reputation and expertise you can count on.
- Q: What’s the difference between consolidation and patch/filling?
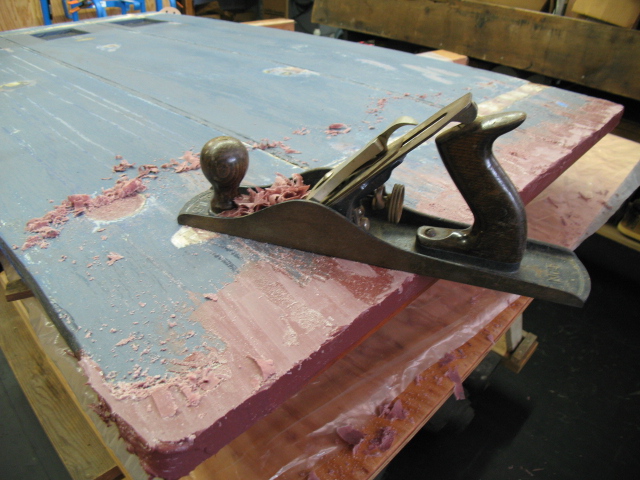
A: ConServ Epoxy 100 Consolidant is a water thin, crystal clear, flexible two-part epoxy used to impregnate or saturate the decayed area of wood. The introduction of sufficient quantities of the flexible epoxy deep into the affected area will serve to consolidate or "petrify" the rotted wood fibers into a durable surface unaffected by the ravages of weather, bugs and abuse. On some repairs with minor surface damage consolidation will suffice to prepare the wood for primer and paint. On repairs requiring larger patches to fill voids and cracks or to replicate damaged shapes, the consolidant 100 must be used as a primer to create a "tough and toothy" base for the 200 patch/filler to adhere to. These void filling repairs call for flexible epoxy filler capable of sticking to the surrounding wood tenaciously while filling and keeping the desired shape. Once cured the ConServ Epoxy 200 Patch/Filler is easily worked to conform to shape and accept fasteners and solid finishes, like wood.
- Q: Do I have to remove all of the rotted wood from the affected area?
A: No, ConServ Epoxy Consolidant 100 is thin enough to penetrate deep into the wood fiber if enough coats are applied. This creates a semi-solid mass capable of withstanding abuse. We recommend removal of all materials lying loosely about the decayed area and or easily stripped away using a HEPA vacuum and simple means such as a scraper, wire brush or the like. It is not necessary to get down to bare new wood in order to ensure the success of the patch. However it is recommended to get down as close to bare wood as possible, especially in areas that won’t allow for good saturation of the 100, such as overhead areas which work against gravity, therefore limiting saturation. In these situations an additional thin mix of 200 (slurry of A, B, C, and a little bit of D) can be applied and allowed to soak into the overhead areas. Then the layer of thicker 200 can be applied. Use common sense to remove what appears weak and allow the consolidant to stabilize the rest. Your goal is to apply or introduce as much consolidant 100 as possible to the softwood. The deeper you are able to penetrate the better the repair will be. Subsequent applications over a period of several hours will promote greater saturation while drilling holes in and around the affected area can enhance penetration in some situations.
- Q: How dry should the wood be before attempting epoxy repairs?
A: Some manufacturers will insist on 20% moisture content or less before even thinking of making epoxy repairs. Likewise you will find in our technical literature that we too adhere to this number. We go on to say that these repairs, if made under laboratory conditions, will optimize the process of creating the best possible conditions for durability and longevity. However, none of us lives in a laboratory and we frequently find it impossible to either accurately measure these conditions or maintain them under job site conditions. This means you need to be sensible and exercise some judgment here. If the materials can be removed to an indoor location you should do so and attempt there to lower the moisture content using whatever means you find available. If not, then you should make reasonable attempts to reduce the presence of everyday moisture in the form of rain, snow, runoff, condensation or whatever for as long a period as is practical prior to scheduling your repairs. These efforts can be enhanced using conventional means such as plastic tarps, tar paper, ventilation, fans, heaters, hair dryers, etc. The point is that you should make every effort possible to reduce that moisture content to as low a level as you can. This will ensure maximum penetration of the consolidant and reduce the risk of continued or future infestation by fungus or insects. It is recommended that professionals have a probe type moisture meter for accurate readings. By using the best materials available and the best effort possible you will give your project the best chance for survival in the future.
- Q: What’s the difference between a cosmetic repair and a structural repair?
A: Most often we refer to structural repairs as those being done to enhance or replace the load carrying ability of a load bearing element in a wood structure that has been compromised by decay. That might mean repairing a girder under a compressive load or splicing a broken load bearing rafter or joist in mid span. It might also mean patching a log, timber or beam at a joint or load transferring point.
Rotted sill beams can usually be repaired with 100, 200 and wood fillers since loads are minimal. For structural epoxy injection into holes using Fiberglass Rebar 800, our Multipurpose Structural Adhesive 552 with static mixers in recommended. Some types of repairs incorporate ConServ Structural Epoxy Repair 600 cast in place, perhaps with fiberglass reinforcing bar in the affected joint or void. Structural repairs can be accomplished by attaching new timbers or wood "Dutchman repairs" to decayed areas along with epoxy and fasteners.
Cosmetic repairs are most often done using ConServ Epoxy Patch/Filler 200 when only superficial loads are applied to elements such as trim, minor framing and sills, or logwork, and decorative millwork. Although strength and durability are important, the integrity and safety of the structure are not in question for these types of repairs. The final appearance of the repair is easily attained because ConServ Epoxy 200 Patch/Filler can be shaped and finished to imitate the original wood element. If after considering these examples, you still have some question as to the appropriate use of the materials, please consult with us and we’ll be glad to help you or your engineer arrive at the proper selection.
- Q: How do I determine how much epoxy I will need to make my repairs?
A: This is likely the most common question we receive. We cannot over the phone get an accurate feel for the degree of deterioration, the depth of the decayed portion or the number of affected areas comprising the repair. We can help you to understand what the materials are capable of doing and thereby make you more able to understand the degree of repair you should be undertaking to perform a proper job.
In the case of consolidation the key word is penetration. You need to introduce as much of the ConServ 100 (or 600 for some structural applications) into the affected area as you are physically and financially able. Job constraints such as money, time, expertise, and so on all have to weigh on your decision to buy more or less epoxy. Is this your house or is it a customer's? Is this an everyday repair or a historically significant structure being conserved? Only you can decide how good is good enough. I will add that if you have made every effort to apply the consolidant in a thorough fashion, and done so in a repeated manner to the point at which it appears to not soak in any further, then you have probably accomplished your task. Our epoxy has a one-year shelf life guarantee and it can last significantly longer if properly kept. This means that you can always use later what seems left over now. Plan ahead to do the job right and deal with any leftovers later!
The ConServ 200 patch/filler is more easily quantified. Since it contains no solvents or evaporating agents it will not shrink and it does not expand, therefore it is a one to one relationship. A ¾ gallon can fills a ¾ gallon void. You should roughly estimate the voids by volume and then think about introducing some dry "filler" wood into any of the very large repair areas. These areas needn’t be filled entirely with epoxy. Any filler pieces of dry wood should be coated with 100 consolidant (esp. on end grain) and set into place with 200 Patch, allowing sufficient epoxy at the surface to facilitate shaping and finishing. Large voids may need two applications to prevent excessive heat buildup during the curing process but generally several inches can be applied at a time safely, especially in large timbers and in cool weather. The S200 cures slower and won’t generate as much heat. The W200 cures faster and is not normally used for larger voids in hot weather. The W200 is often used in colder weather and for finish coats when a quicker cure is desired.
- Q: Must I wait for the consolidant to cure fully before applying epoxy patch on top?
A: No, this isn’t necessary because the resins are compatible and the curing will simply go on simultaneously. This will in fact promote a better layering of the two applications as the resins bond together during final curing. This also enhances production since they can both be applied during the same visit. The 100 Consolidant can also be allowed to cure fully or partially and the 200 Patch will still bond to the 100.
- Q: Can the epoxy products be mixed in smaller quantities than those in which they’re sold?
A: Yes, but it is preferred that people unfamiliar with our products purchase smaller quantities that can be mixed as formulated. Then if they find the need, the components can be mixed by volume following the directions on the Instructions Sheet to combine the listed ratio of A Resin with B Hardener. This means that if the label says 2.75 parts resin to 1 part hardener you can measure with syringes, cups, bottles, vials, etc. and still produce a fairly accurate mix. There are also instructions for weight ratios. Each product has its own mix ratio and they are shown on the appropriate instruction sheet. An easy way to "breakdown" the 100 and 200 epoxies into smaller quantities is to use the clear bottles and cans that we sell. Then pour the full amount of A into the desired number of batches until the bottles appear equal. These bottles are then poured into cans for storage and later used as your mixing container. The A bottles can be saved for this same use in the future. Divide the B into an equal number of bottles. (DO NOT use the same bottles you’ve measured the A ingredient in.) Now you have effectively divided the units into sets of equal parts and they can be easily recombined at a later date. Note: The smaller the volumes you are measuring out, the more chances there are for errors in your ratio. When breaking down the 200, the C filler should also be roughly measured out into the same number of sets and sealed in zip bags. The D ingredient should be used from the one bag as needed to create the desired consistency for each application. View our Breakdown Video to see this demonstrated. Due to the chemistry that comprises our 100 and 200 epoxy products, the ratios do not lend themselves well to using pumps. We are constantly striving to make our products easy and efficient to use. We now offer 5 sizes of our 100 and 200 formulas, and 6 sizes of the 600 epoxy.
- Q: Can epoxy repairs be painted or stained to match surrounding areas?
A: Yes, most appearance grade repairs are done using Consolidant 100 and Patch 200, which are both compatible with conventional alkyd or latex primer, solid stain and paint. Stain will adhere and dry but penetration differs from that of the surrounding wood causing the color to vary. Subsequent applications of pigment to these areas might be necessary to "blend" the patch with the older wood. You can request a white filler for the 200 rather than our standard red/brown if that is needed when using semi transparent stain.
- Q: Where can I get ConServ products?
A: ConServ Epoxy products can be ordered through this website, or called into our office. On receipt of your order, we will ship it the same day or within 24 hours via UPS ground to your home, office or jobsite.


